Introduction
This chapter shows how PTV xServer is used with Java. Client classes are helpful to access web services![]() A web service represents a communication technology applied in computer networks. It provides an interface described in a machine-processable format, for example WSDL. of the xServer.
For convenience the xServer comes with two different Java clients, one for the SOAP
A web service represents a communication technology applied in computer networks. It provides an interface described in a machine-processable format, for example WSDL. of the xServer.
For convenience the xServer comes with two different Java clients, one for the SOAP![]() SOAP (Simple Object Access Protocol) is a protocol specification for exchanging structured information in the context of Web services. XML is used for definition of the message format, and it is based on other application layer protocols, like Hypertext Transfer Protocol (HTTP) or Simple Mail Transfer Protocol (SMTP). API generated with JAX-WS and one
for the JSON
SOAP (Simple Object Access Protocol) is a protocol specification for exchanging structured information in the context of Web services. XML is used for definition of the message format, and it is based on other application layer protocols, like Hypertext Transfer Protocol (HTTP) or Simple Mail Transfer Protocol (SMTP). API generated with JAX-WS and one
for the JSON![]() JSON (JavaScript Object Notation) is an open standard format for which human-readable text is used to transmit information consisting of attribute–value pairs. It is the first-address data format used for asynchronous browser/server communication (AJAX). API generated based on an OpenAPI document.
JSON (JavaScript Object Notation) is an open standard format for which human-readable text is used to transmit information consisting of attribute–value pairs. It is the first-address data format used for asynchronous browser/server communication (AJAX). API generated based on an OpenAPI document.
If you prefer other frameworks like cxf, clients can be generated using a WSDL provided by the xServer (cf. chapter Generating Clients for the SOAP API below).
If you intend to generate classes for the JSON API, please consult the chapter Generating Clients for the JSON API below.
Using the Bundled Clients for the SOAP API
The SOAP API clients can be found in the directory java/soap of the bundle and are standard JAX-WS clients. They can be used with Java 8 and above,
but PTV recommends to use either Java 8 or Java 17, as the client classes are tested with these Java versions.
If you use Java 11 or above you have to add also the jaxws runtime libraries, as the jax-ws APIs were removed from JDK 11.
These runtime jars are also provided in the subdirectory 3rdParty-Java11+. All clients of PTV xServer can be
downloaded or can be found in the subdirectory
client-bundle of the PTV xServer's installation directory.
The clients are backward compatible but we recommend using the client-bundle with the same version as your PTV xServer.
For experimental features it is required to use the
xserver-client-bundle-<version>.zip
with the same version as the PTV xServer.
To start a project, follow these steps:
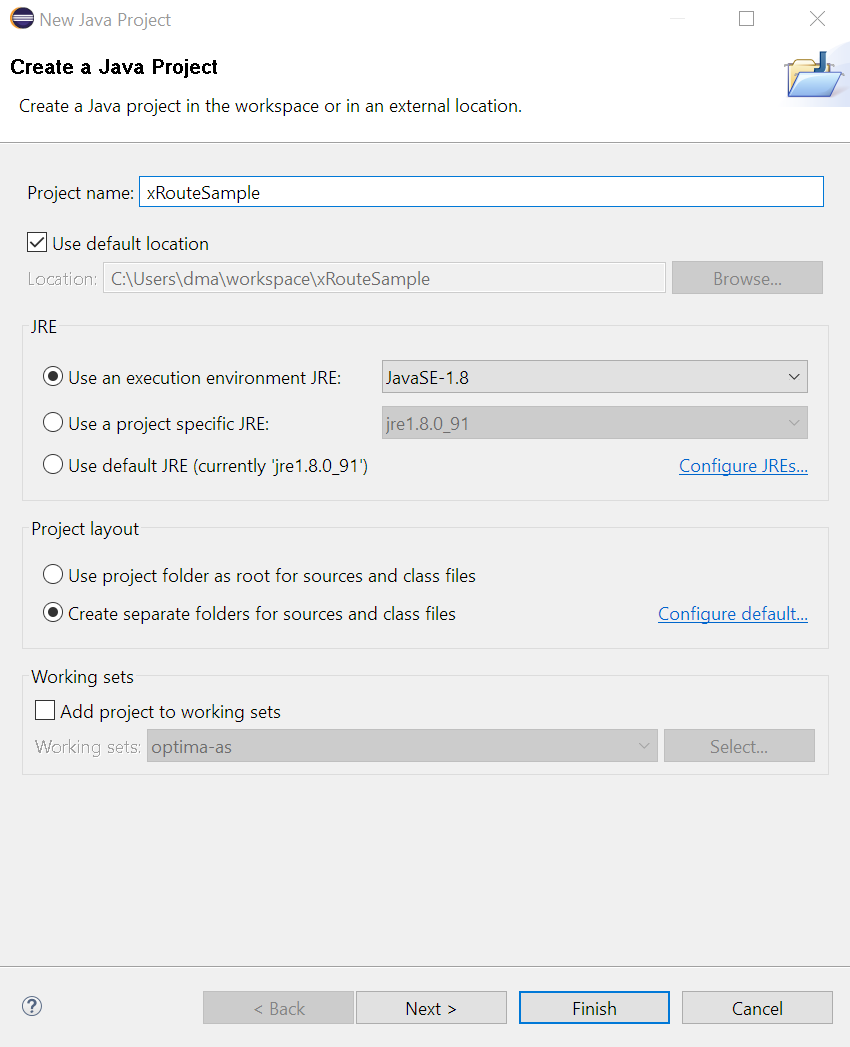
Step 1
- Create a new Java project by selecting File -> New -> Java Project.
- Give your sample a name, for example xRouteSample.
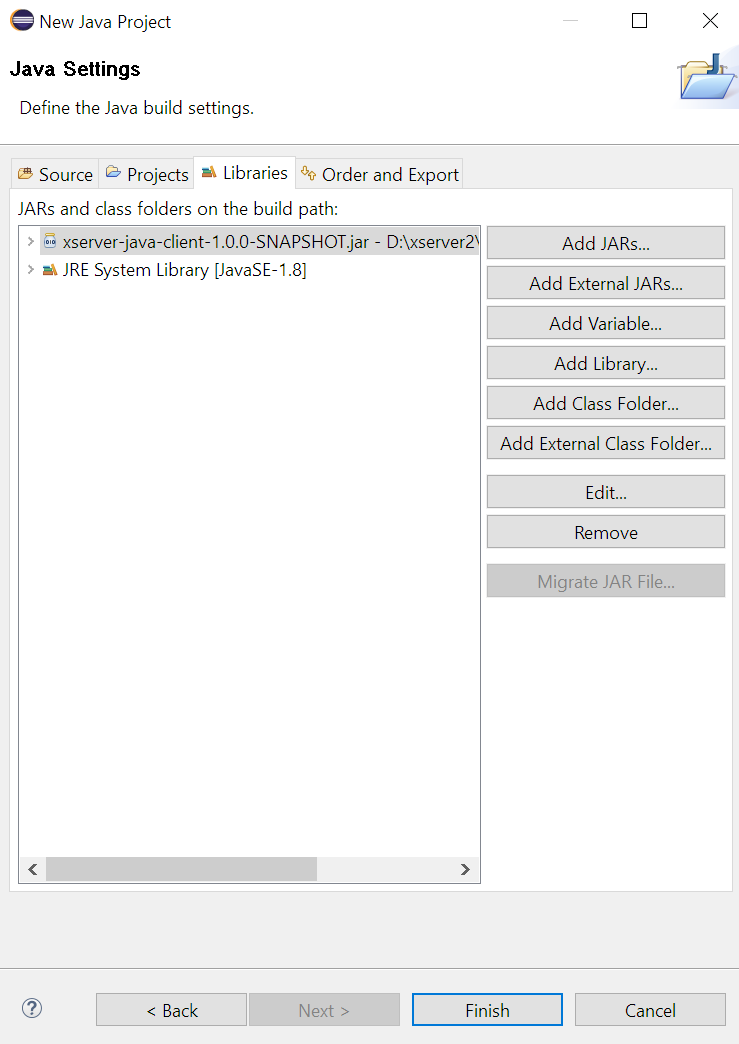
Step 2
- Click next and switch to the libraries tab.
- Add the
xserver-java-soap-client.jar(orxserver-java-soap-client-experimental.jar) as an external library and click finish.
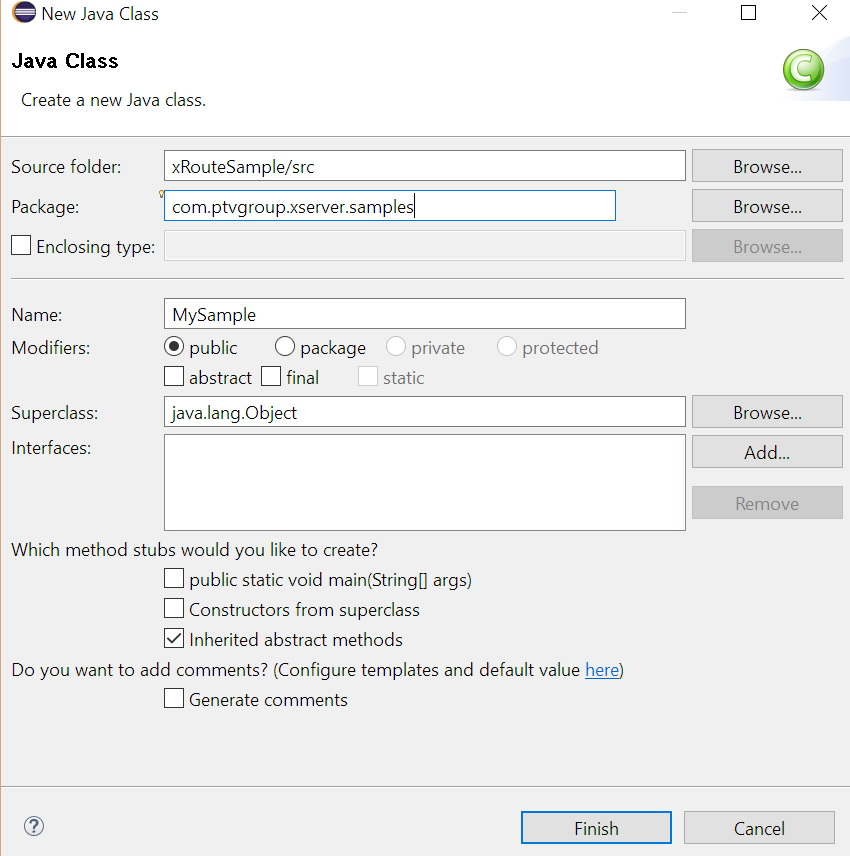
Step 3
- Right click on the src directory in your new project and select New -> Class to create your sample class.
- Give it a package name and a class name and click finish.
Step 4
Enter the following code, which calculates a simple two waypoint![]() A waypoint is a geographic location used to specify start, destination and possible stopovers for a route. route
A waypoint is a geographic location used to specify start, destination and possible stopovers for a route. route![]() A route corresponds to a path of a vehicle through the underlying transport network. The main attributes of a route are the distance and the time that the vehicle travels along the path.:
A route corresponds to a path of a vehicle through the underlying transport network. The main attributes of a route are the distance and the time that the vehicle travels along the path.:
import java.net.MalformedURLException;
import java.net.URL;

import com.ptvgroup.xserver.exceptions.XServerFault;
import com.ptvgroup.xserver.geometry.Coordinate;
import com.ptvgroup.xserver.routing.OffRoadRouteLocation;
import com.ptvgroup.xserver.xroute.OffRoadWaypoint;
import com.ptvgroup.xserver.xroute.RouteRequest;
import com.ptvgroup.xserver.xroute.RouteResponse;
import com.ptvgroup.xserver.xroute.XRoute;
import com.ptvgroup.xserver.xroute.XRoute_Service;
import com.ptvgroup.xserver.xroute.XServerException;

public class TestClass {

	public static void main(String[] args) {

		// Replace this URL by the IP and port of your xServer!
		String baseUrl = "http://localhost:50000";
		try {
			// create a xroute client
			XRoute client = (XRoute) new XRoute_Service(new URL(baseUrl + "/services/ws/XRoute?wsdl")).getXroute();

			// create a RouteRequest and set up 2 waypoints
			RouteRequest request = new RouteRequest();
			OffRoadWaypoint w1 = new OffRoadWaypoint();
			OffRoadRouteLocation orl1 = new OffRoadRouteLocation();
			Coordinate c1 = new Coordinate();
			c1.setX(6.22029);
			c1.setY(49.61513);
			orl1.setOffRoadCoordinate(c1);
			w1.setLocation(orl1);
			OffRoadWaypoint w2 = new OffRoadWaypoint();
			OffRoadRouteLocation orl2 = new OffRoadRouteLocation();
			Coordinate c2 = new Coordinate();
			c2.setX(6.06479);
			c2.setY(49.62127);
			orl2.setOffRoadCoordinate(c2);
			w2.setLocation(orl2);
			request.getWaypoints().add(w1);
			request.getWaypoints().add(w2);


			// run the request
			RouteResponse response = client.calculateRoute(request);

			// print out result
			System.out.println("Route distance: " + response.getDistance() + "m.");
		} catch (XServerException e) {
			XServerFault fault = e.getFaultInfo();
			System.out.println("Message: " + e.getMessage());
			System.out.println("Fault hint: " + fault.getHint());
		} catch (MalformedURLException e) {
			e.printStackTrace();
		}
	}
}
Step 5
Run the code by clicking the Run button in the Eclipse toolbar.
You should then see the following output in the console window:
Route distance: 18825.0mUsing the Bundled Clients for the JSON API
The JSON API clients can be found in the directory java/openapi of the bundle. They can be used with Java 8 and above,
but PTV Logistics recommends to use either Java 8 or Java 17, as the client classes are tested with these Java versions.
- Please note, that starting with xServer 2.35 the client classes are generated by OpenAPI Generator. If you still want to use the client classes
generated by Autorest you can find them in the
deprecatedsubfolder. For Autorest generated clients the tileBinary method needs some special handling! - Properties of Type xs:dateTime are generated as String to be able to use dates without specifiying a UTC offset.
Step 1
Step 2
As step 2 for the SOAP API, but add the xserver-java-oas-client.jar or
xserver-java-oas-client-experimental.jar as an external library to the project instead.
3rdParty subdirectory as external libraries.
Step 3
Step 4
Enter the following code, which calculates a simple two waypoint route:
import java.util.Arrays;

import com.fasterxml.jackson.core.JsonProcessingException;
import com.ptvlogistics.xserver.client.ApiClient;
import com.ptvlogistics.xserver.client.ApiException;
import com.ptvlogistics.xserver.client.api.XRouteApi;
import com.ptvlogistics.xserver.client.model.Coordinate;
import com.ptvlogistics.xserver.client.model.OffRoadRouteLocation;
import com.ptvlogistics.xserver.client.model.OffRoadWaypoint;
import com.ptvlogistics.xserver.client.model.RouteRequest;
import com.ptvlogistics.xserver.client.model.RouteResponse;
import com.ptvlogistics.xserver.client.model.XServerError;
import com.ptvlogistics.xserver.client.model.XServerFault;

class TestClass {

    public static void main(String[] args) {
        // Replace this URL by the IP and port of your xServer!
        XRouteApi xRouteApi = new XRouteApi(new ApiClient()
                .setBasePath("http://localhost:50000")
        );

        try {
            RouteRequest request = new RouteRequest()
                    .waypoints(Arrays.asList(
                            new OffRoadWaypoint().location(toRouteLocation(6.11286163330, 49.61771709551)),
                            new OffRoadWaypoint().location(toRouteLocation(6.14067077636, 49.60448050792))
                    ));

            RouteResponse response = xRouteApi.calculateRoute().body(request).execute();
            System.out.println("Route distance: " + response.getDistance() + "m.");

        } catch (ApiException apiException) {

            try {
                XServerError xserverError = xRouteApi.getApiClient().getJSON().getMapper()
                        .readValue(apiException.getResponseBody(), XServerError.class);
                XServerFault fault = xserverError.getFaultInfo();
                System.out.println("Error message: " + xserverError.getMessage());
                System.out.println("Fault hint: " + fault.getHint());

            } catch (JsonProcessingException processingException) {
                throw new RuntimeException(processingException);
            }

        }
    }

    private static OffRoadRouteLocation toRouteLocation(double x, double y) {
        return new OffRoadRouteLocation()
                .offRoadCoordinate(new Coordinate()
                        .x(x)
                        .y(y));
    }
}
Step 5
Run the code by clicking the Run button in the Eclipse toolbar.
You should then see the following output in the console window:
Route distance: 3924.0m.Using the client-bundle in a Maven project
There are two options to integrate the client bundle provided by the xServer in a Maven project:
Using a multi-module Maven project
To use the xServer client bundle in a multi-module project, add the following configuration to the parent pom of the module you want to use the clients in:
<plugins>
    <plugin>
        <artifactId>maven-antrun-plugin</artifactId>
        <version>{version}</version>
        <executions>
            <execution>
                <id>download and unpack xServer client bundle</id>
                <phase>generate-sources</phase>
                <configuration>
                    <target>
                        <get src="{xServerHost}/dashboard/Content/Resources/xserver-client-bundle/xserver-client-bundle-{clientVersion}.zip"
                            dest="${project.build.directory}/xserver-client-bundle.zip"/>
                        <unzip src="${project.build.directory}/xserver-client-bundle.zip" dest="${project.build.directory}/xserver-client-bundle" />
                    </target>
                </configuration>
                <goals>
                    <goal>run</goal>
                </goals>
            </execution>
        </executions>
    </plugin>
    <plugin>
        <groupId>org.apache.maven.plugins</groupId>
        <artifactId>maven-install-plugin</artifactId>
        <version>{version}</version>
        <executions>
            <execution>
                <id>install xServer client bundle</id>
                <phase>generate-sources</phase>
                <goals>
                    <goal>install-file</goal>
                </goals>
                <configuration>
                    <groupId>{groupId}</groupId>
                    <artifactId>{artifactId}</artifactId>
                    <version>{version}</version>
                    <packaging>jar</packaging>
                    <file>${project.build.directory}/xserver-client-bundle/java/{path to desired jar file}</file>
                </configuration>
            </execution>
        </executions>
    </plugin>
</plugins>
After that add the client bundle as dependency to the child module:
<dependencies>
    <dependency>
        <groupId>com.ptvgroup</groupId>
        <artifactId>xserver-java-oas-client-experimental</artifactId>
        <version>1.0</version>
    </dependency>
</dependencies>
In the child pom disable the steps done in the parent pom if you don't want to repeat them in the child module:
<plugins>
    <plugin>
        <artifactId>maven-antrun-plugin</artifactId>
        <version>1.8</version>
        <executions>
            <execution>
                <id>download and unpack xServer client bundle</id>
                <phase>none</phase>
            </execution>
        </executions>
    </plugin>
    <plugin>
        <groupId>org.apache.maven.plugins</groupId>
        <artifactId>maven-install-plugin</artifactId>
        <version>2.5</version>
        <executions>
            <execution>
                <id>install xServer client bundle</id>
                <phase>none</phase>
            </execution>
        </executions>
    </plugin>
</plugins>
Using a single-module Maven project
To use the xServer client bundle in a single-module project, first download and install the client in your local directory using
mvn install:install-file -Dfile=<path-to-file> -DgroupId=<group-id> -DartifactId=<artifact-id> -Dversion=<version> -Dpackaging=<packaging>
and add the client as dependency:
<dependencies>
    <dependency>
        <groupId>com.ptvgroup</groupId>
        <artifactId>xserver-java-oas-client-experimental</artifactId>
        <version>1.0</version>
    </dependency>
</dependencies>
Afterwards you can add the steps used in the multi-module to automatically update your client when building your project:
<plugins>
    <plugin>
        <artifactId>maven-antrun-plugin</artifactId>
        <version>1.8</version>
        <executions>
            <execution>
                <id>download and unpack xServer client bundle</id>
                <phase>generate-sources</phase>
                <configuration>
                    <target>
                        <get src="{xServerHost}/dashboard/Content/Resources/xserver-client-bundle/xserver-client-bundle-{clientVersion}.zip"
                            dest="${project.build.directory}/xserver-client-bundle.zip"/>
                        <unzip src="${project.build.directory}/xserver-client-bundle.zip" dest="${project.build.directory}/xserver-client-bundle" />
                    </target>
                </configuration>
                <goals>
                    <goal>run</goal>
                </goals>
            </execution>
        </executions>
    </plugin>
    <plugin>
        <groupId>org.apache.maven.plugins</groupId>
        <artifactId>maven-install-plugin</artifactId>
        <version>2.5</version>
        <executions>
            <execution>
                <id>install xServer client bundle</id>
                <phase>generate-sources</phase>
                <goals>
                    <goal>install-file</goal>
                </goals>
                <configuration>
                    <groupId>com.ptvgroup</groupId>
                    <artifactId>xserver-java-oas-client-experimental</artifactId>
                    <version>1.0</version>
                    <packaging>jar</packaging>
                    <file>${project.build.directory}/xserver-client-bundle/java/{path to desired jar file}</file>
                </configuration>
            </execution>
        </executions>
    </plugin>
</plugins>
Generating Clients for the SOAP API
Generating Clients for the JSON API
The JSON API of PTV xServer provides two different options for generation, WADL or OpenAPI 2.0 documents. While WADL is also supported by soapUI there are a lot of different tools to generate clients from an OpenAPI 2.0 document. In order to improve the quality of client generation the OpenAPI documents contain some vendor extensions. Some important notes regarding the OpenAPI Documents can be found here.
paths are currently added to the OpenAPI documents for such operations (e. g. tile).
Special handling for Binary Responses for Autorest generated clients
tileBinary method requires an interceptor to deal with chunked responses:
    class ChunkInterceptor implements okhttp3.Interceptor {
        @NotNull
        @Override
        public Response intercept(Chain chain) throws IOException {
            Response response = chain.proceed(chain.request());
            ResponseBody body = response.body();
            if (body != null) {
                body.source().request(Long.MAX_VALUE);
            }
            return response;
        }

    }
    okhttp3.OkHttpClient.Builder builder = new okhttp3.OkHttpClient.Builder();
    builder.addInterceptor(new ChunkInterceptor());
    xServerApi = new XServerImpl("<the baseUrl>", builder, new Retrofit.Builder());